Case work
The components inside the supergun make the gaming experience, but it's the outside that gives it the whiz-bang and sex appeal. So you don't want to screw up or do a hack job on the case. Which means having the right tools, the right project box, and the patience to make it look right. The good thing is cases are cheap enough that even if you screw it up, you can start fresh. Just do the hard parts first so you don't do a bunch of work and then have to start over because you made the controller ports too wide.
Mark the case - You know, this sounds simple, but I can guarantee you that you will make at least one error in placement of parts with your first job. Critical things to consider when laying out the case:
Size of the components. Not all RCA mounts are the same size. And the retaining lip may only be 1/16" bigger than the thread (meaning if you make the hole too big, the component will slip through it!). And don't forget that the nut and washer need to have enough space to peacefully exist on the inside of the box!
How many items need to be placed and where. If you want component, S-Video, and composite video along with stereo mounts, that's already 10 parts to go on one side! And do you wan the power switch on the front, back, or side?
Don't let parts touch on the inside. You don't want you RGB potentiometers to short to ground on another component, right? Make sure there is enough space on the inside and remember you will have to use pliers/wrenches to twist everything tightly into place
Drilling holes - This too sounds very obvious. Drill. Hole. But, the key is size of the hole and avoiding drifting in the location. When you start drilling on a smooth surface, you can bet that the drill bit will drift a bit. It's a good idea to start drilling with your Unibit and to stop and check your alignment before the hole is done. Then you can compensate a bit. Also, if you are drilling three "related holes" in a row (like R, G, and B lines), drill the end holes first. It will be infinitely easier to do the middle hole last and that way you can much more easily visually line the holes up while drilling.
Controller ports - You should probably do this before the other holes because if you muck this up, you'll have to start with a new case. And this is the place you'll probably have problems in your early efforts.
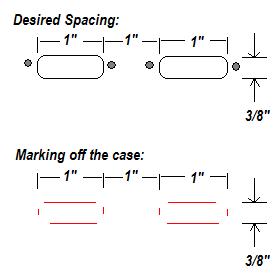
I'm of the school that the controller ports (DB-15 connectors for the most part) should be rear-mounted, meaning they are pushed from the inside of the case to the outside, leaving the metal shielding on the inside of the case. More eye-appeal. But this also means you have to really do a nice job of making the holes for the ports. Find the center of the case (or not, if you don't want the ports centered) and mark off the top and bottom at about 3/8" inches apart (the approx height of the connector body) and draw lines there, but only where you are sure the connector hole will be (so you don't have to remove marks later). Like this:
Now using your lines as a guide, you can either press your DB-15 on top of the case to make a bit of an indent where the metal edge digs or make a little cutout of the DB-15 to trace the hole.